


Article content
Taking super sharp photos can be quite a challenge, even for the most experienced photographers.
And it is indisputable that a good telephoto lens will help you to conquer this brand, more and then what to do if the bank account is not that fat?
In recent years we have seen an invasion of great lenses, including telephoto lenses, from third-party manufacturers like Sigma and Tamron. In the past we had to avail ourselves of a lot of money and opportunity to buy telephoto lenses, and superteles, from manufacturers like Nikon and Canon.
And often the money was not enough, as some lenses had, and still have, extremely limited production.
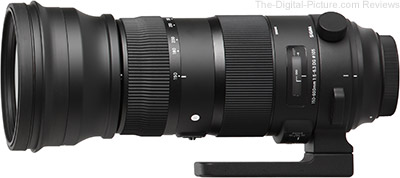
Thankfully, brands like Sigma brought us a little wonder, the Sigma 150-600mm f / 5-6.3 DG OS HSM .
Well it’s not that small, but for those who are going to take pictures of wildlife it’s a beautiful addition!
Using such a long lens can lead to several problems and that is why the article in today’s article will give you tips on how to take super sharp photos using telephoto.
6 tips for taking super sharp photos

1 – Choose the correct shutter speed
Choosing the shutter speed well is perhaps the most important task here, especially if we are talking about long telephoto lenses. There is a simple, easy-to-remember rule, and it’s not just for long lenses.
If you are using a 500mm lens for example the shutter speed cannot be less than 1/500. In case you are using a 300mm lens the same rule applies, only here you will use the shutter set to at least 1/300.
Following this rule you will minimize any possible blur and allow you to take sharper photos. Eventually you will use a stabilized lens, in which case you will use a slightly slower shutter speed than the focal range of your lens.
And of course, if you use mirrorless cameras , some of them have sensors with stabilization systems, which will also help you to have clearer photos.
NOTE: This rule is applicable for full frame cameras . If you are using an APS-C sensor camera with a full frame lens, possible for both Nikon and Canon. You cannot forget the crop factor, which is 1.5x for Nikon, 1.6x for Canon.
If you are using a 500mm lens on an APS-C sensor camera, it will become a 750mm lens for the 800mm Nikon for the Canon.
Soon your shutter speed will have to follow the focal length of the lens.

Normally, very long telephoto lenses are usually not very sharp at the end of their course, close to the final focal length.
So try to avoid using a focal length that is close to the maximum limit of your telephoto lens.
2 – Use the correct aperture value
In wildlife photography, depth of field plays an excellent role in helping to make the subject stand out from the background.
So a good tool to highlight what you’re photographing from the background would be to use an aperture close to F / 2.8.
However, this can have a negative side, making its depth of field very narrow, and compromising the sharpness of the photo.
I usually suggest using a slightly smaller aperture, or at least close to the sweet spot on your lens. Normally a lens’ sweet spot is about 2 to 3 stops above the largest aperture of your lens.
So if you’re using a lens where the largest aperture is F 5, your sweet spot will probably be between F / 8 or F / 11.
This way you will be able to use everything to your advantage to take super sharp photos.

3 – Selecting the ISO sensitivity
ISO sensitivity is one side of the exposure triangle that needs to be adjusted according to the shutter speed and aperture value required for the photo.
In the case of wildlife photography, you will have to compromise the ISO a bit in relation to the other settings. Why?
You will have to use a fast shutter speed to freeze the movement of the subject and an aperture value that is not so large to capture sharper photos. This is the reason why you may have to increase the ISO value to capture a well-exposed photo.
Therefore, the ISO should be the last exposure setting that you will adjust to display the photo correctly.

NOTE: Some cameras are capable of handling very high ISO settings without introducing so much noise into the photos, while others are not. Always try to use common sense and try not to exceed the limit of your equipment, so in addition to taking super sharp photos you will also not have much noise to deal with in post-production.
4 – Use a tripod or monopod
Unless you are Superman, I always recommend using a tripod or monopod when working with long lenses. In addition to ensuring the safety of your equipment, the use of a tripod will create a better stabilization point for your photos.
If you are working with very long lenses, consider also having one with a collar on your lens to fit the tripod. There are countless brands of good tripods out there, and some of them are worth every penny. Look for something that fits your budget but also gets the job done.

5 – Image stabilization mode on your lens
In a situation where you need to move your camera along with the moving animal or bird, make sure that you have activated image stabilization on your lens.
This is useful if you are using the camera with your hands, as it reduces vibration caused when panning or tilting the camera. The image stabilization mode can be found on lenses like IS on Canon lenses, VR on Nikon lenses, VC Tamron lenses and OSS on Sony lenses.
But in case you are using a tripod or monopod as recommended above, turn off the image stabilization mode on the lens. Because it will produce a little shake that can leave the images with a little less sharpness, when mounted on the tripod.
So, to eliminate this small movement, you must turn off the image stabilization mode on your camera when using a tripod.

6 – Explore the Back Button Focus
If you are not already using the focus button behind the body of your camera, I advise you to configure it now, give a Google on how to configure this on your camera!
With this feature activated, you will reduce the amount of vibration introduced into the camera when you have to press the shutter button halfway for the auto focus to come on. Besides the fact that you can work with the pre-focus technique very easily, where you focus on the subject before it is in the photographed place. The back focus button helps you take super sharp photos.

Conclusion
Using a good super-screen lens is pretty cool, but it’s important that you understand the technical aspects to get better results. Do not lose heart, because until you refine your technique you will take many pictures out of focus. So to take super sharp photos with this type of lens don’t forget the main points.
- Shutter speed
- Aperture adjustment
- ISO adjustment
- Use of tripod or monopod
- Image stabilization on the lens
- Using the focus assist button on the camera
It is possible to apply what you read here for any type of photography, not just for super telephoto lenses. Using these techniques to make portraits for example, will guarantee you super sharp photos with a quality that will surprise you.
Now only one thing is missing. Go out and start clicking, only then will you develop your technique and reach the expected results.

And do you use telephoto lenses? What do you do to take super sharp photos? Put it in the comments.

