


Article content
Today we are going to talk about a little hidden gem, the zone system, which can be applied to you photography in order to help you make great images.
Have you ever wondered how some photographers can produce photos that look so radically different from what we can see with our own eyes?
Digital photography allows you to manipulate photos using a computer to make them surreal, or to transform more than one photo into a single incredible image. Some cameras include features that can produce high dynamic range (HDR) images, multiple exposures, or even black and white photographs.
Although there are some of these today, some answers are not in the future of photography but in its past. Having a good understanding of certain techniques and the physics of light, you can produce images that look unreal right on the camera.
You don’t have to rely on super modern camera technology or heavy use of post-processing to create great work. And knowing how to use the zone system in photography will be the first step for you to master not only your camera but also how it and you will see the light.
A brief introduction to the zone system
The zone system has been around for decades. It was developed by Ansel Adams and Fred Archer based on sensitometry, which is the study of materials sensitive to light. It is a tool designed to help photographers plan and control the exposure or post processing of an image. Naturally, as it emerged in the mid-1930s, it was created for use with film.
Although there are arguments against the application of this technique in digital photography, I believe that even today it is very useful. Adams and Archer divided the spectrum of tones between black and white into eleven zones and assigned a Roman numeral to each.
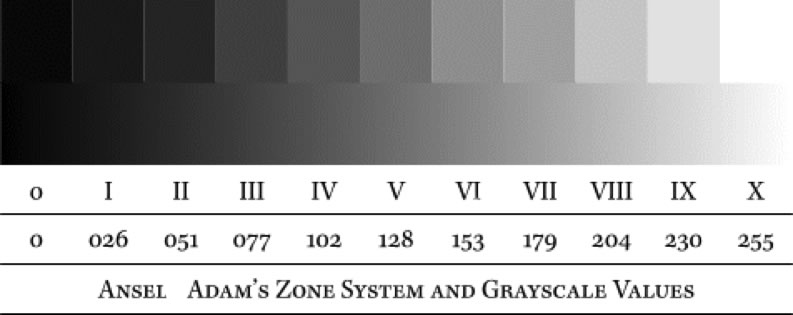
Zone 0 is black, zone X is white, zone V is medium gray, or 18% gray. Each zone is separated by a photographic stop. Despite being a super technical concept, the zone system in photography is necessary when it comes to exposure or photo development, it can be a very valid guide. Of course, this alone will not make your image win awards, but it will be of great value to help you see the scene.
Zone system is just another tool in your kit
We can only use it as guidelines, so life is much simpler. Unlike a lot of things that we saw about “rules”, learning them and then breaking them, the zone system is based on scientific facts, thus you cannot break it.
Learning how to apply the technique will give you more freedom to be creative with your camera. Consider this as just another tool in your kit. Like any tool, you need to first learn the basics of what it does and how you use it so that it does what you want.
Why bother to learn the Zone System?
Many people do not know but all modern cameras are calibrated so that when we take a capture, the exposure value to be achieved is medium gray, 18% gray. This value is halfway between black and white.
However, when a scene contains many bright areas, the camera tries to render them as tending towards the middle, darkening it, and thus causing underexposure. On the other hand, when a scene contains many dark areas, it tries to render them as tending to middle again, causing overexposure.
So knowing how your camera interprets light is fundamental to understanding how a scene exposure works.
We, as human beings, see in color and not black and white, and there are colors that are considered in the middle of the spectrum of color.
That is, they reflect an average amount of light, which is approximately the same amount as the middle gray. Learning how to interpret the midtones is essential to implant the zone system in photography.
Certain situations are complicated to photograph such as a white rabbit in the snow or a black dog on a black carpet. If you leave all the measurements to your camera, it will turn everything into medium gray (18% gray), where it understands that the photo would be well exposed.
This is true for the camera, but not necessarily for the photo. And using the zone system helps to solve this puzzle in order to always get a good exposure.
Key concepts of the zone system
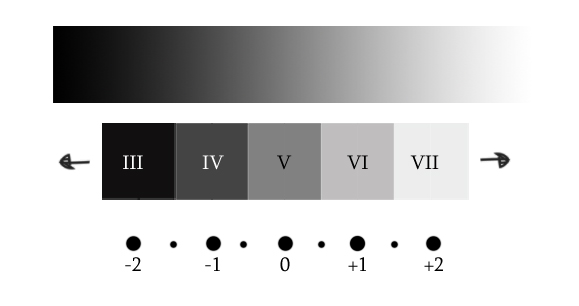
The zone system can divide a scene into up to 11 zones on the tone scale (the most common variations are 9,10 and 11 divisions).
Each tonal range is assigned to a zone. Each zone is 1 Stop away from both the previous and the subsequent zones. So all equivalent zone changes when changing a stop.
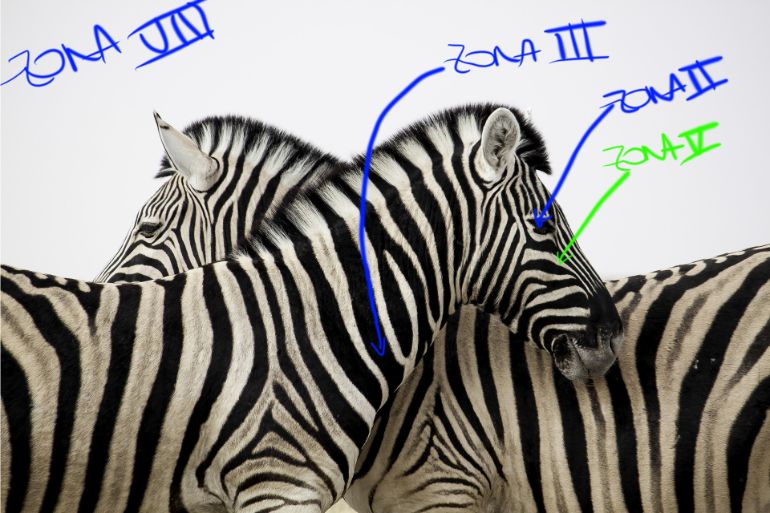
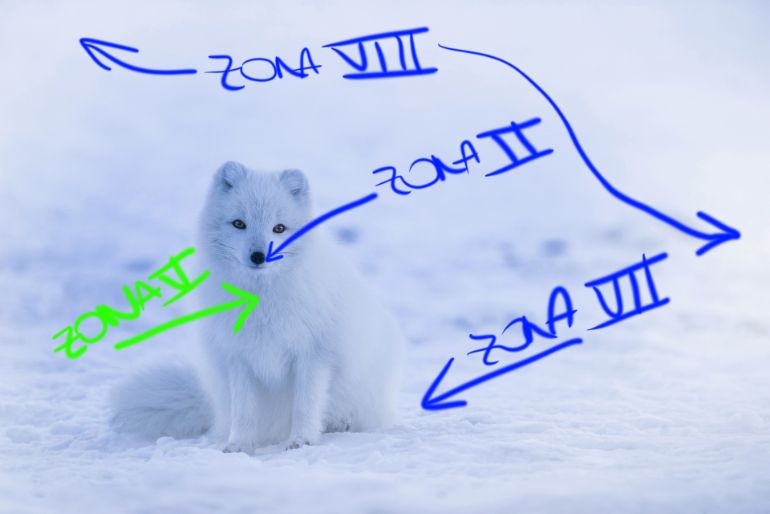
In digital photography, we are usually more concerned with zones between III and VII, with the lightest regions in zone III and the brightest in zone VII.
The zones below III in digital photography are shown only as pure black, therefore without details, and the same goes for regions above zone VII that are pure white also without details. Every time we use the camera’s photometry and read something that the photometer considers 0, well exposed, in fact it is considering that area as V zone, gray 18%. If you open the lens or slow down the shutter speed in a stop, this area will be overexposed in a 1 stop, and the same goes in the opposite direction.
Example, if you are measuring an area considered zone VI and you double the shutter speed now the same area will be considered zone V. The same goes for the opposite direction; Imagining the measurement in zone V and you reduce the shutter speed in half, the measured zone will move to zone IV.
So you now know the manipulation of the zones can be done on the camera, adding or removing light or changing the region of the scene that will serve as a reference for measuring exposure.
Colors and Zones
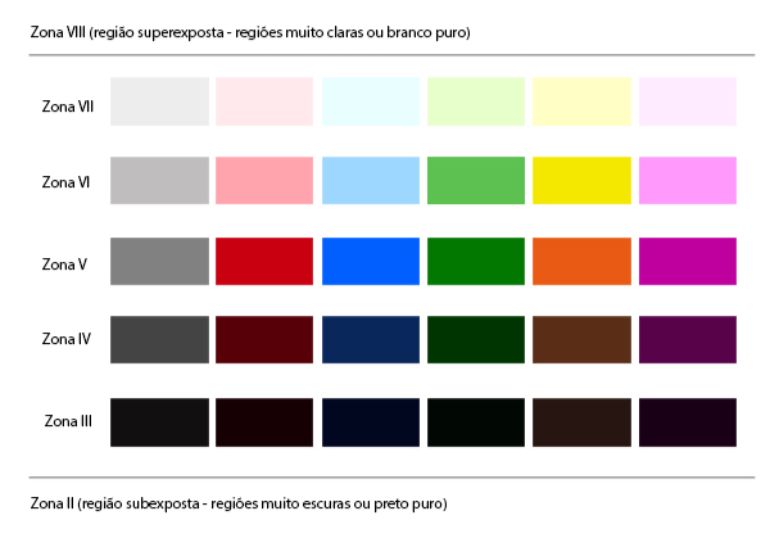
Of course, the world is not black and white, there are a multitude of colors and the zone system can also be used in color images. Therefore, the thing can complicate a little more, but anyway this technique is super valid to achieve not only for having a good exposure of the photo but also the fidelity of the colors.
As can be seen from the image above, the medium colors would render correctly when placed in a middle zone which is zone V. As they are correctly displayed, they will appear in the final photo in the same way that they appear in reality, without changing the exposure.
These shades include green grass or tree leaves, red flowers, clear blue sky, etc …
Shades of color slightly brighter than average should be placed in zone VI. These colors are more like pastels or faded medium colors. If you are photographing something with these colors as the main scene, try to adjust your camera so that it compensates for the exposure and does not manipulate the colors.
These shades include pure yellow, bright pink red, baby blue, baby pink among others.
Color tones brighter than that should be placed in zone VII. Some of them are; white, white clouds, fog, smoke, mist, shiny sand.
Color tones slightly darker than average should be placed in zone IV. Those include tree trunks, dark blue skies, and so on.
Darker color tones that should generally be placed in zone III. These tones include black, extreme shadows, charcoal and the like.
In digital photography, a generally correct (technically speaking) exposure of a medium scene is one that is exposed to medium tones, without blown white. Nowadays it is possible to work with dark areas of the darser photo, as it is still possible to recover details in the post.
Speaking of light, white areas, it is not possible to recover details once it has already exceeded the ideal value.
Of course, we don’t just have black and white in this matter, we can also make references to some colors to determine which zone they are in.
We can see in the photos that even areas that are colored can be qualified in zones.
This is very useful because if you are using a particular area of the photo to measure your exposure.
Portrait photography and the zone system
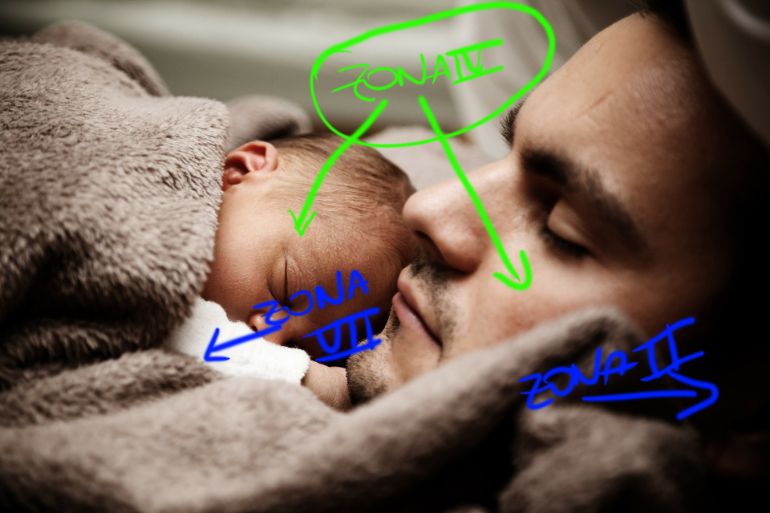
While landscape photographers are more familiar with the colors of mountains, trees, skies, seas, and so on in the zone system, portrait photographers can create a correlation between the zone system and skin tones.
Most skin tones are usually between zone IV and zone VI, except for a few exceptions, such as really light or dark skin tones. Usually when we are making portraits we are more concerned with creating a good exposure for the person’s skin tone, so the zone system can be very important.
It will help you to have a correct exposure and also not to manipulate the skin color, so, only advantages. Pay attention to the entire composition because we also have eye color, clothing color and background color and other elements that will have to be exposed correctly as well.
Evaluating High Dynamic Range Scenes
When a scene has a huge difference between the darkest and the lightest shades, it means that it has a high dynamic range, making it impossible to maintain all the details of the image with a single shot.
So, unless you are planning to take several different photos and then combine them in post-processing, you will definitely have to make some commitment.
Will you expose to the light or dark part of the photo?
I usually advise that and expose the slightly underexposed photo to preserve the bright parts of the photo. Thisway you can enjoy the dynamic range of your camera a little better, taking just a single photo. However today it is possible to use a technique called HDR, High Dynamic Range, where you will take more than one photo and combine them. This mixing can be done directly on the camera or in some post production software.
First you need more than one scene file with different exposures, usually underexposed, overexposed files in addition to a well exposed file. And then just use some editing software to combine the images and create a photo that uses an average of the darkest and lightest areas of the files used.
My favorite program for this job is not Photoshop or Lightroom, but Aurora HDR 2019, which is exclusive for HDR work.
It is not easy, but neither is rocket science
Some people may argue that the zone system was not created for, nor does it apply to, digital photography, but the truth is that it works as well as for film photography. Maybe not exactly the same way it was intended to be used, but it certainly makes a big difference for you and your photography.
Like learning anything, you must practice to become proficient. To become an expert, you must practice a lot more. The zone system is not that complicated. When you understand the basics, you can apply it as part of your overall skill set. Then you can make extensive use of it and see the difference in your photographs.
As a general rule, with common scenes, just point the camera at a medium color, place it in zone V and then recompose if necessary. With high dynamic range scenes, unless you are planning to do multiple exposures, manipulating the lighting may be the easiest way out. Adding light, using filters in front of the lens, or simply blocking existing lighting are big steps in decreasing the dynamic range of a scene.
So did I get it? Leave your comments below.

